

This series of posts began with the discovery a mistake, and an attempt to fix the problem. In this post, the series finishes with the production of optimized braiding diagrams.
Part 1: Resynthesizing the circuits
Part 2: Reconceptualizing the distillation
Part 3: (this post) Rebraiding the factory
Starting point
Before we really begin, let's take a look at our competition. Here is the braiding diagram from the original paper (minor mistakes pointed out in part 1 notwithstanding):
The above diagram has a depth of 12 (count white cubes from left to right).
In order to compare apples to apples, and to finally get this post finished, I won't be using the allow-k-to-be-odd or T-saving tricks I explained in parts 1 and 2. The circuit that we will be laying out braids for will be a slightly different form of the block code circuit than the ones I showed in previous parts. I made this form of the circuit, with a nicely optimized depth, just for this post.
Well, actually, there's a bit of a snag with the circuit.
You see, in the several months that this post was sitting half-done I, uh, well... I lost it. I still had the braiding diagrams I'd derived from it, but despite a few hours effort I wasn't able to start from the circuits I had in the previous parts of this series and re-derive the circuit I intended to use here. I had to work backwards from the braiding diagrams in order to recover the circuit. Here it is:
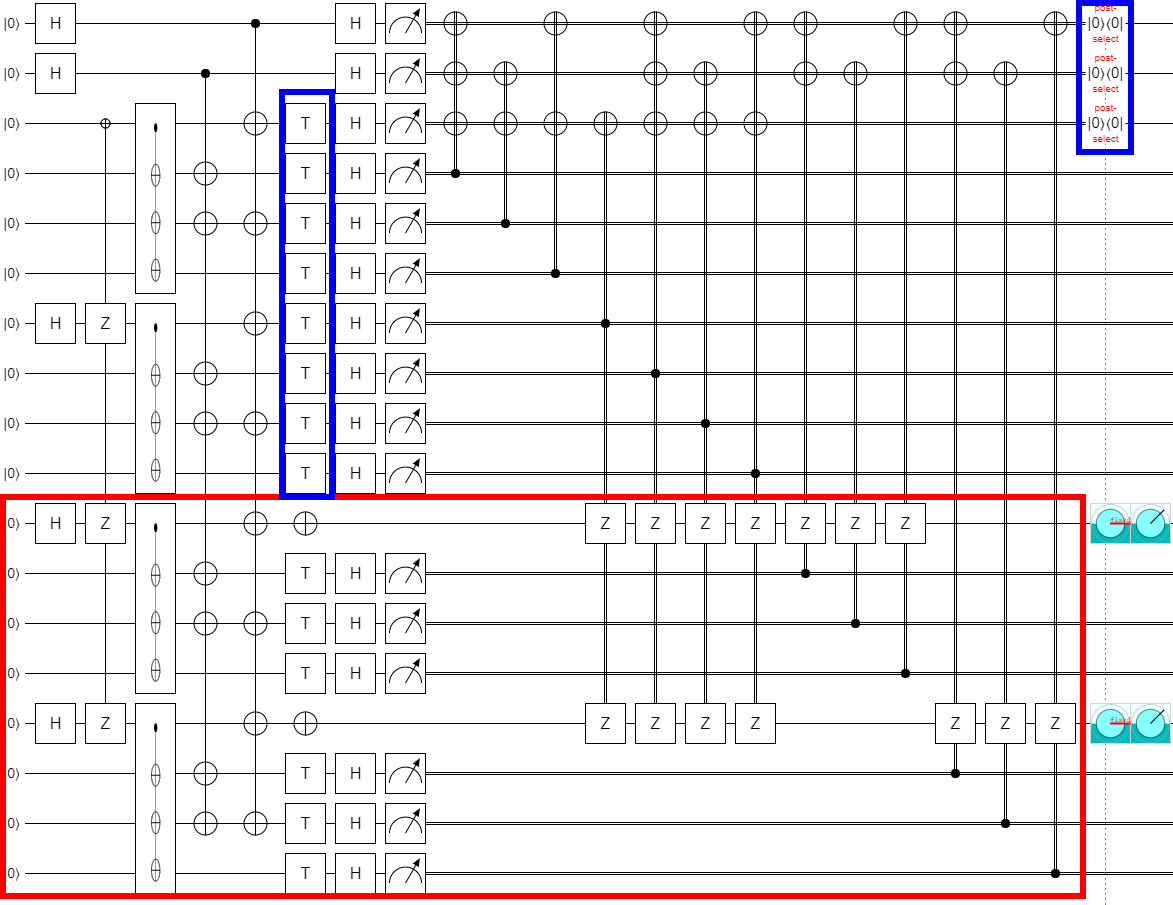
Note that the above circuit has 18 qubits, but the maximum supported by Quirk is 16. Regardless, here is a Quirk link to the circuit. You'll only be able to truly open it if you copy-paste the '#circuit=...' part of the link into a development version of Quirk that you've modified to allow 18 qubits. (Versions modified to allow 18 qubits are much slower, and the simulation can become unstable due to floating point precision issues. So I'll leave playing with the circuit in Quirk as an exercise for the highly motivated reader.)
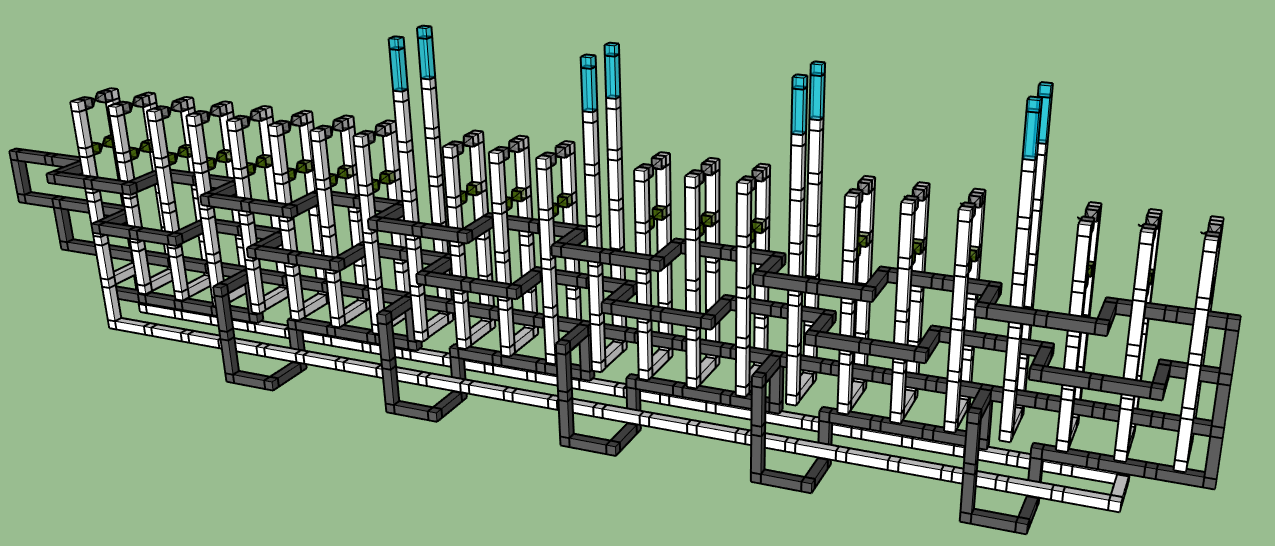
The red box in the diagram is showing the "tiling unit". If you want more T state outputs, you vertically stack more of these tiling units (except for the columns with controls within the tiling unit; those have to become new columns when tiling). The parts outlined in blue are "places I had to add NOT gates to make it work when the number of tiling units was even instead of odd". Sorry I can't be more specific than that, I only really checked k=0 and k=2; there may be slight variations for k=4. This is a consequence of losing the original diagram.
Braiding the circuit
Our initial braiding diagram is basically going to be the canonical braids for each gate of this circuit, one after the other, from start to finish. The only caveat is that we have to replace the multi-target X-controlled Z gate with multiple independent CNOT gates, since there's not a native way to do that operation. Don't worry, we'll eventually fix the explosion in depth due to this conversion.
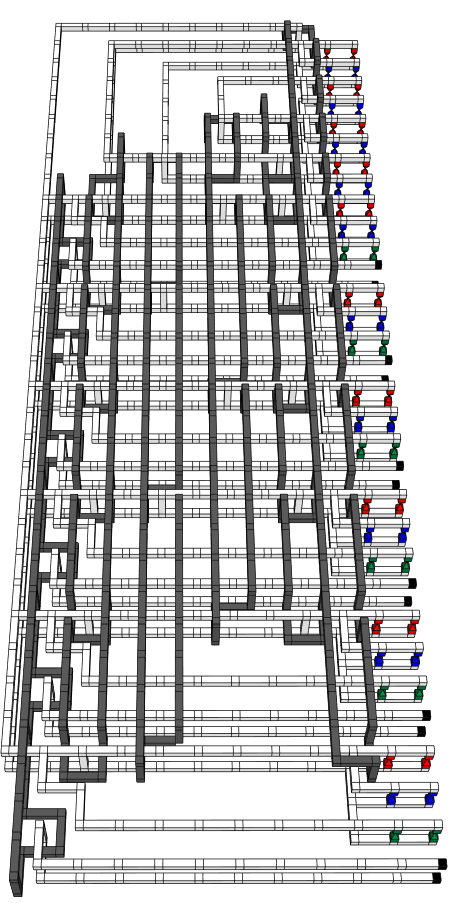
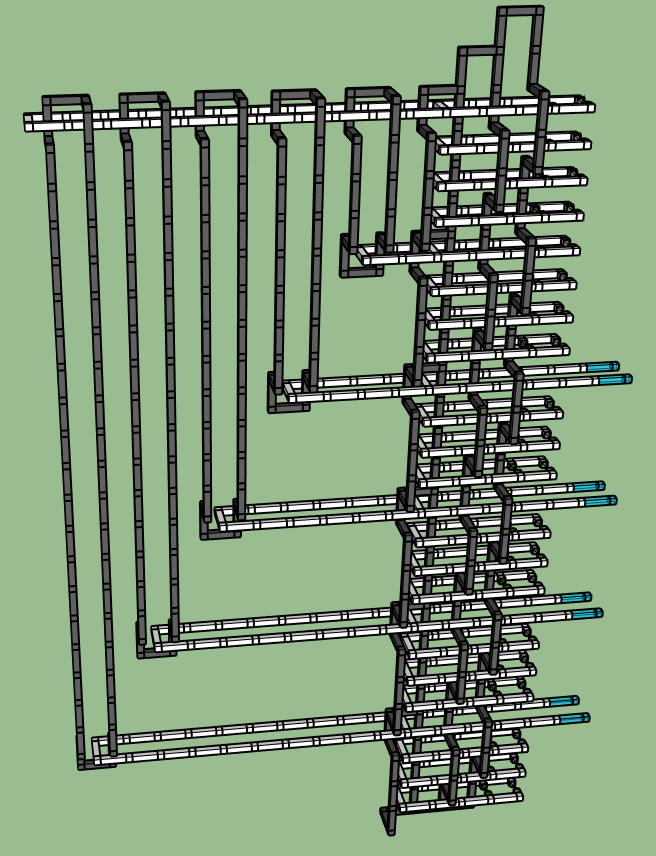
Basically, we have a nice trivially-correct place to start from:
Now, because this computation is topological in nature, any deformation of the shape that doesn't change how white and black chunks are tied around each other is allowed. For starters, anywhere there's a "pole" sticking out, we can retract the pole. For poles emerging from a ring, the pole retracts into the ring. For poles that are just a pole and nothing else, the pole retracts all the way into nothingness.
There are quite a lot of white poles in the starting diagram. Here's the result of retracting them:
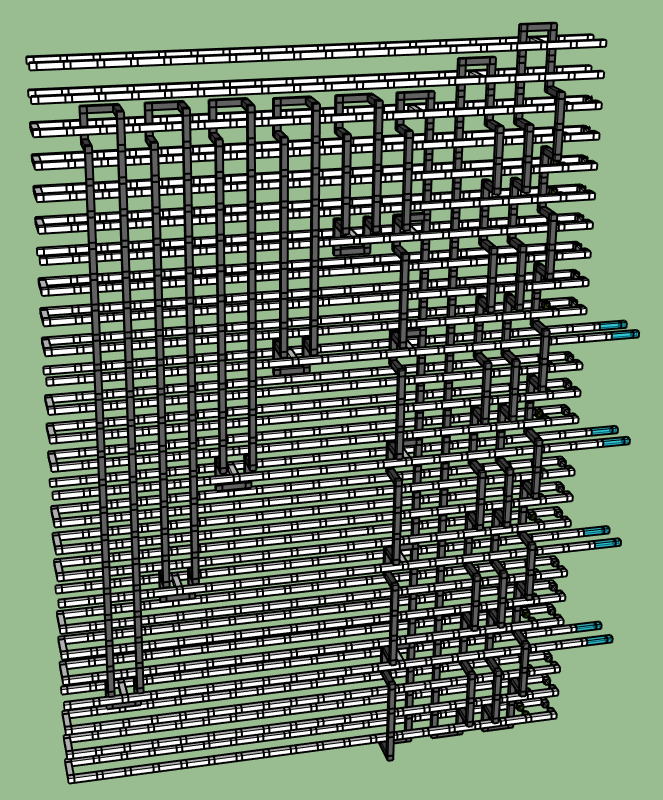
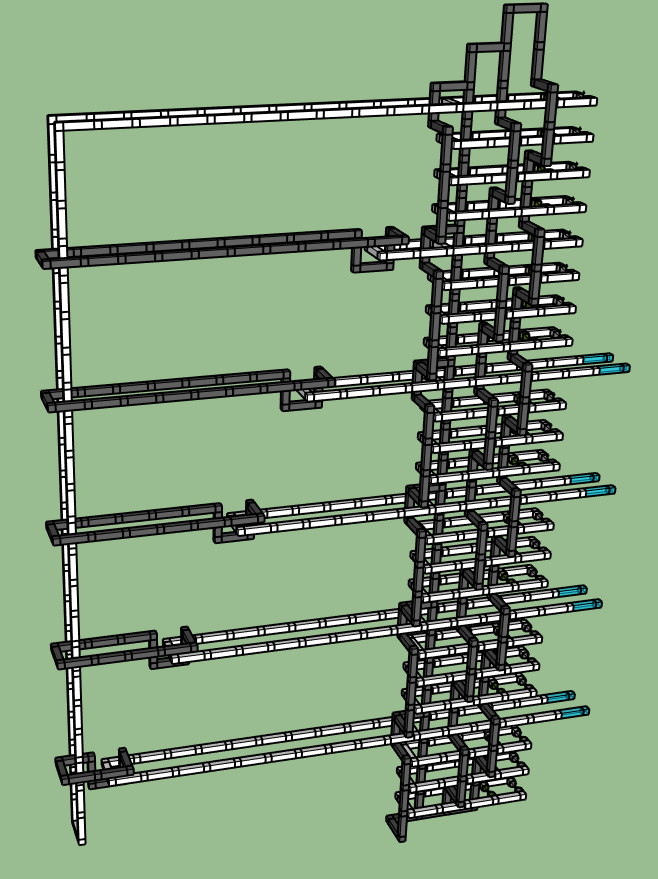
An optimization we can perform that does change the topology, but not the computation, is "bridging". When you have two finite chunks of the same color, you can add a bridge piece connecting them. This bridge typically starts as a single connecting line, then expands and grows until the two shapes have been sucked into each other much more intimately.
I was careful, when laying out the canonical circuit, to make sure that the multi-target CNOT operations (the tall black structures) had matching sides. This allows us to bridge them in a way that simply merges their sides:
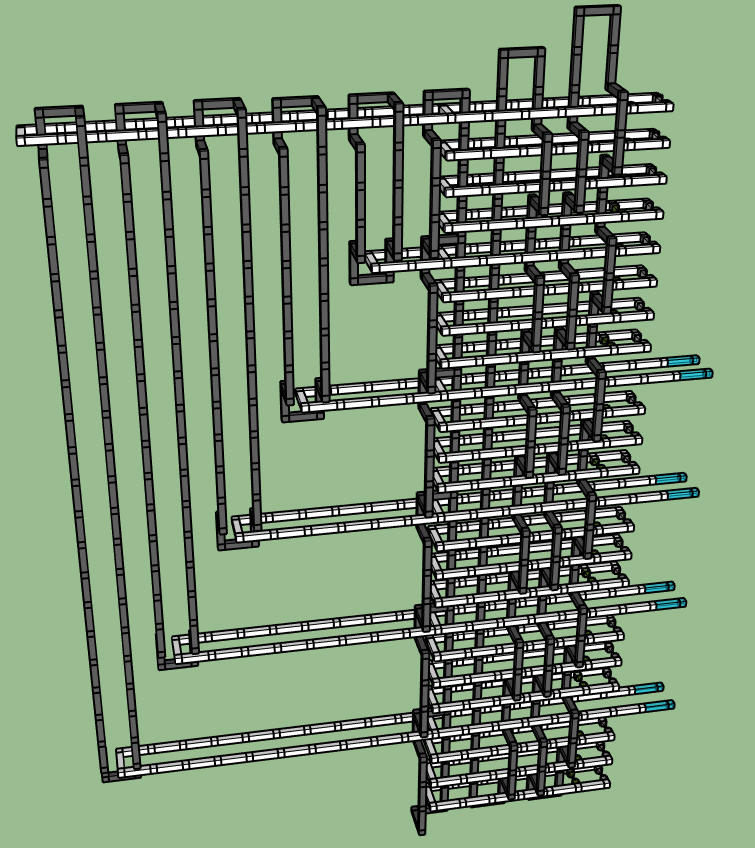
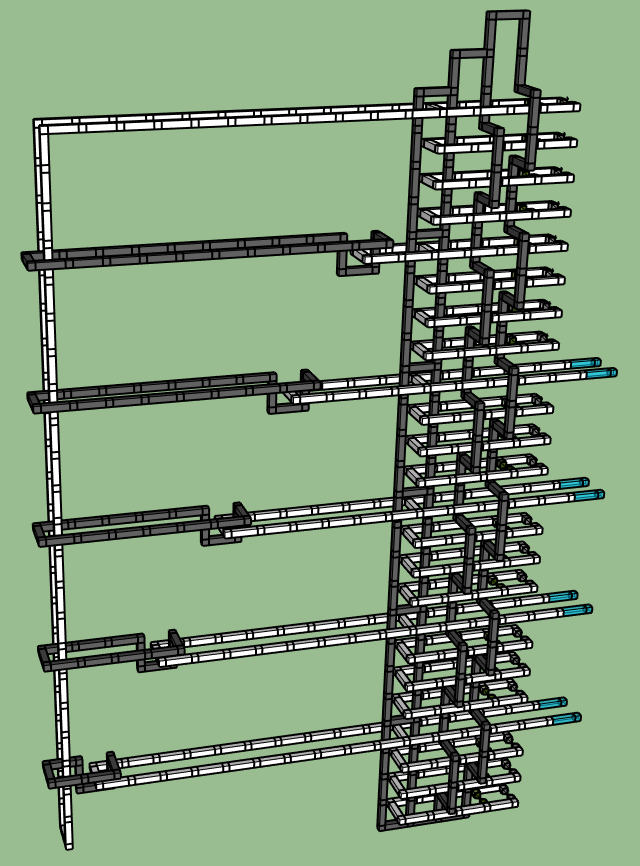
Next we're going to fix that giant staircase on the left, caused by replacing the multi-target X-controlled Z with many CNOTs. The key idea here is that, if we take the white ring extending left along the top, and pull it downward, then we can slide each of the black rings around that white ring to also point left. This makes it so that the rings no longer overlap in the horizontal direction:
Now we do a small prepatory move, before pulling those horizontal black rings rightward, by flattening out the vertical black rings that the horizontal black rings will be bridged into. We could have made this move as soon as the white poles had retracted, but we're making it now instead:
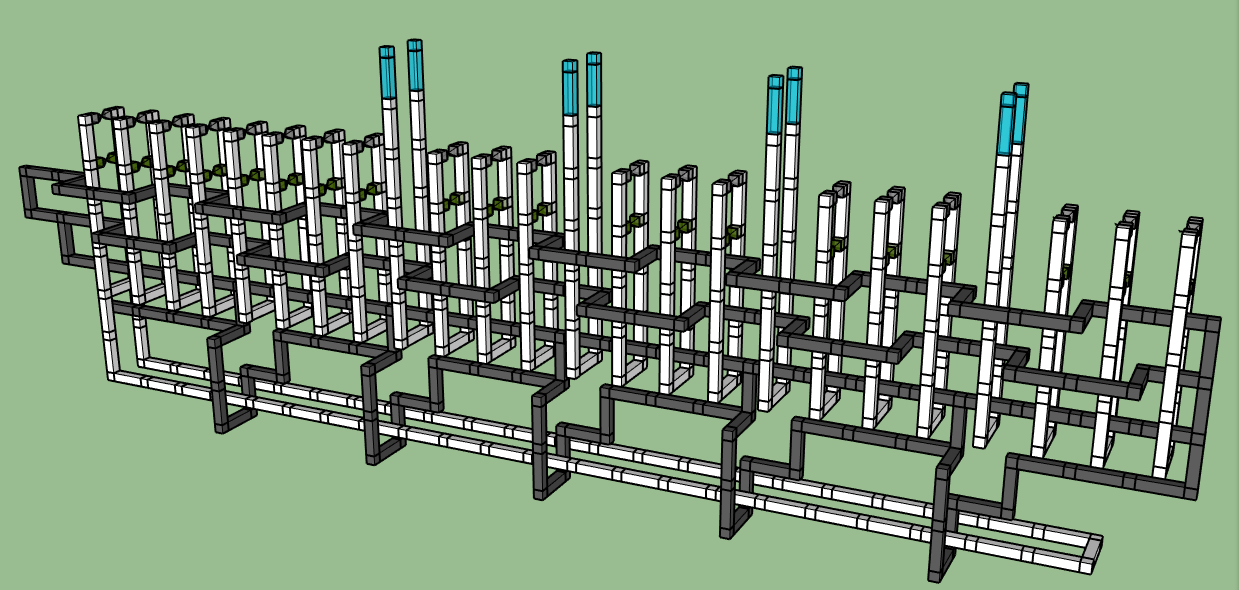
It's now possible to pull the horizontal black rings in tight, bridging them into the vertical rings. Let's also switch our perspective, so that time is moving upward instead of rightward:

Now that we've bridge-compressed the black rings, a new feature has appeared in the diagram: there are white rings completely surrounding single black poles. These rings actually "cut" the black poles (it's impossible for quantum correlations to make it through the ring, so its contents may as well not be present), and then the ring can be collapsed. Here's the result of doing that:
Then just a bit of tightening up:
And that's it! If you count the white boxes from bottom to top, you'll see we're at depth 7 instead of depth 12. (Well, actually, you'd want the outputs to exit backward heading into the far distance so they don't overlap with the next instantiation of the factory coming immediately afterwards. But you can close the white outputs around black rings to send them sideways.)
There are more optimizations we can do. For example, we still have the opportunity to add bridges between several of the white chunks. I'm positive the construction can go down to depth 6. But I've been putting off this blog post for months, and in my mind braiding has been superceded by lattice surgery, so let's call 7 close-enough-to-half of 12 and leave it at that.
Takeaways
Optimizations at the circuit level can make a huge difference in depth at the braiding level.
Multi-target X-controlled Z gates can be laid out in O(1) depth, at least when they appear at the start of a circuit.
When you find a nice circuit, save it somewhere where you can find it again months later.
